What is SAML?
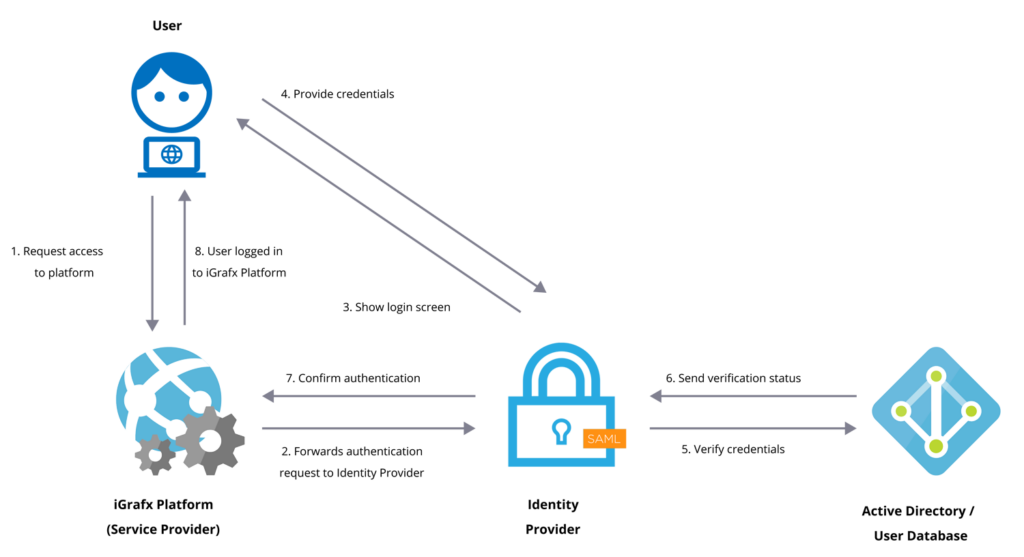
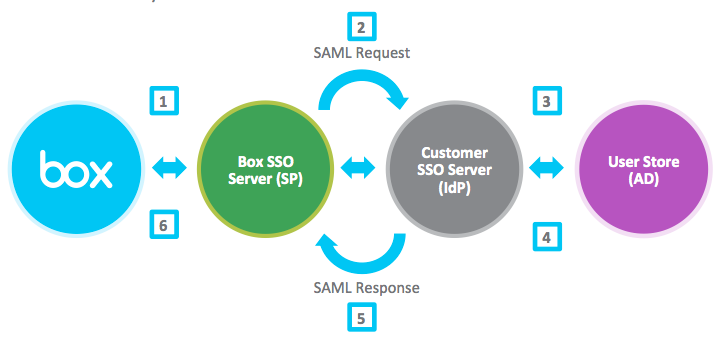
SAML, which stands for Security Assertion Markup Language, is a protocol used for authentication and authorization between two entities without the need for passwords. It is based on XML and provides a framework for secure communication between a service provider (SP) and an identity provider (IdP).
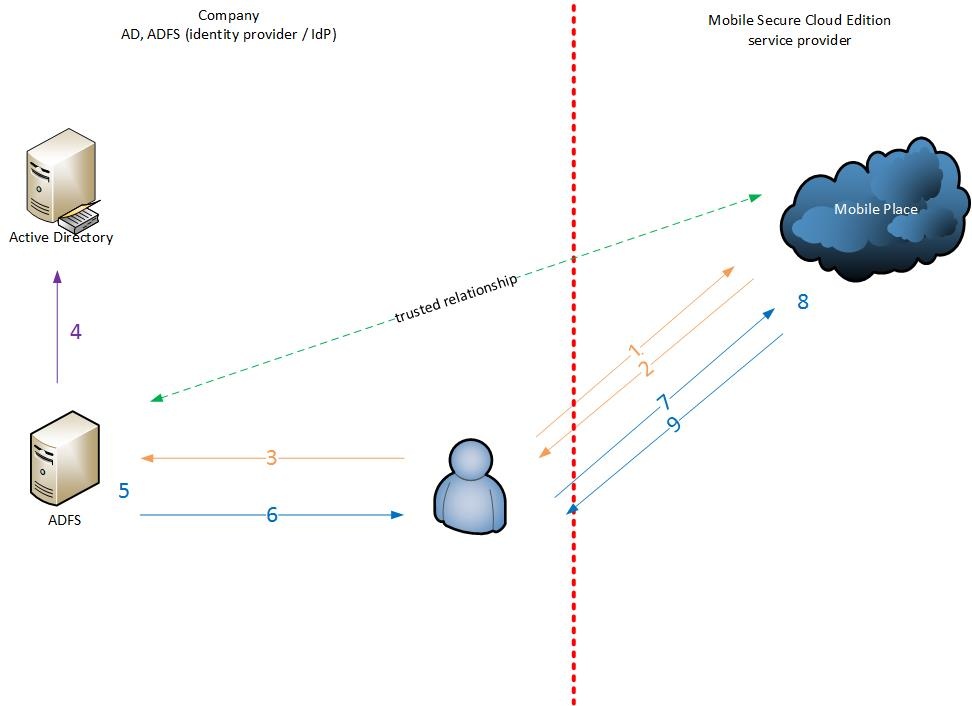
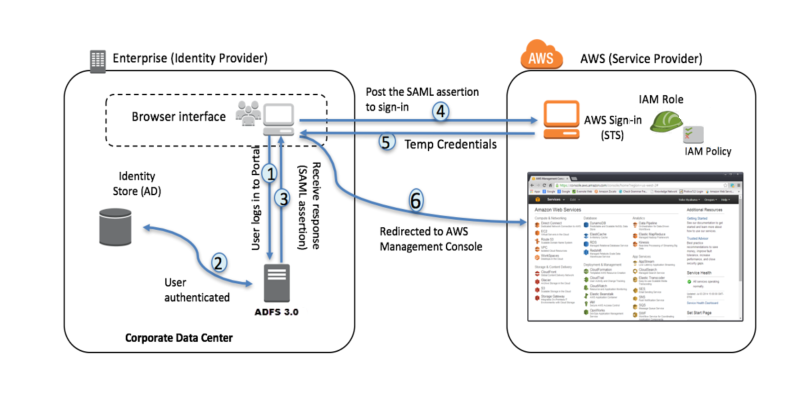
In the SAML framework, the service provider trusts the identity provider to authenticate users. The identity provider verifies the user’s identity and generates an authentication assertion, which confirms that the user has been successfully authenticated. This assertion is then passed on to the service provider.
Auth0 supports the SAML protocol and can act as both the identity provider (IdP) and the service provider (SP). This means that Auth0 can handle SAML2 web applications, SAML single sign-on (SSO) integrations, and IdP-initiated SSO. Additionally, Auth0 supports integration with Microsoft Active Directory Federation Services (ADFS), a popular IdP.
Furthermore, Auth0 provides features such as SAML request signing and encrypting, which enhance the security of SAML-based authentication and communication.
Overall, SAML is a powerful protocol that allows for secure and seamless authentication and authorization between different systems and applications, and Auth0 offers comprehensive support for SAML-based workflows.
1. Create using federation metadata
To create a claims aware Relying Party Trust using federation metadata, please follow these steps:
Go to the Create a claims aware Relying Party Trust using federation metadata page on MSDN.
In Step 4, where it asks for the Federation metadata address, enter the URL in one of the following formats based on your region:
For the US region: https://{yourTenantName}.auth0.com/samlp/metadata?connection={connectionName}
For the EU region: https://{yourTenantName}.eu.auth0.com/samlp/metadata?connection={connectionName}
For the AU region: https://{yourTenantName}.au.auth0.com/samlp/metadata?connection={connectionName}
For the JP region: https://{yourTenantName}.jp.auth0.com/samlp/metadata?connection=CONNECTION_NAME
If you are using a custom domain: https://{yourTenantName}/samlp/metadata?connection={connectionName}
Replace “{yourTenantName}” with your actual tenant name, and “{connectionName}” with the name of your connection.
Once you have entered the correct Federation metadata address, follow the instructions provided on the MSDN page to complete the creation of the relying party trust.
After you have successfully created the relying party trust, you can proceed to the next section or perform any additional configuration steps as required.
Please note that the provided URLs are examples and should be replaced with the appropriate values for your specific configuration.
2. Create manually
To manually create a relying party trust, follow these steps:
Launch your instance of ADFS and open the Add Relying Party Trust wizard.
On the Welcome page, choose Claims aware and click Start.
On the Select Data Source page, select “Enter data about the relying party manually” and click Next.
On the Specify Display Name page, provide a descriptive name for your relying party. The recommended format is “urn:auth0:{yourTenant}:{yourConnectionName}”. Add a brief description under Notes. Replace “{yourConnectionName}” with a unique name that will also be used to create a connection in Auth0 later. If you’re unsure of the connection name, you can edit it later. Click Next.
On the Configure Certificate page, click Next. You will return to configure the certificate later.
On the Configure URL page, enable support for the SAML 2.0 WebSSO protocol by checking the box. Provide a placeholder URL for the Relying party SAML 2.0 SSO service URL for now. You will revisit this step later. Click Next.
On the Configure Identifiers page, set the Relying party trust identifier to “urn:auth0:{yourTenant}:{yourConnectionName}” (or the value you used as the display name in the previous step). Click Next.
On the Choose Access Control Policy page, select “Permit everyone” and click Next.
Review the settings on the Ready to Add Trust page and click Next to save your information. If successful, a message will indicate this on the Finish page.
Make sure the “Configure claims issuance policy for this application” checkbox is selected and click Close.
By following these steps, you will have manually created a relying party trust.

3. Claim Issuance Policy
After closing the Add Relying Party Trust wizard, follow these steps to configure claim issuance rules:
In the Edit Claim Issuance Policy window, click “Add Rule…” to launch the wizard.
Select “Send LDAP Attributes as Claims” as the Claim rule template and click Next.
Provide a name for the Claim rule, such as “LDAP Attributes” (you can choose any name you prefer).
Choose “Active Directory” as the Attribute Store.
Map your LDAP attributes to the corresponding outgoing claim types using the table below:
LDAP Attribute –> Outgoing Claim
E-Mail-Addresses –> E-Mail Address
Display-Name –> Name
User-Principal-Name –> Name ID
Given-Name –> Given Name
Surname –> Surname
The Name ID outgoing claim should always be present to ensure correct session handling. It is recommended to include all the claims listed above, especially the E-Mail Address claim, as they are commonly used. You can add additional claim mappings if needed.
Click Finish to complete the wizard.
In the Edit Claim Issuance Policy window, click Apply. You can now exit out of this window.
By following these steps, you have configured the claim issuance rules for your relying party trust
4. Export Signing Certificate
To export the signing certificate from the ADFS console, follow these steps:
Using the left-hand navigation pane, go to ADFS > Service > Certificates.
Select the Token-signing certificate from the list, and right-click to select “View Certificate”.
In the Certificate window, navigate to the Details tab.
Click on the “Copy to File…” button. This will launch the Certificate Export Wizard.
Click Next to proceed.
Choose the option “Base-64 encoded X.509 (.CER)” as the format you want to use. Then click Next.
Specify the location where you want to save the exported certificate file. Choose a suitable location and provide the file name. Then click Next.
Review the settings for your certificate export and ensure they are correct. Click Finish to complete the export process.
By following these steps, you will have successfully exported the signing certificate from the ADFS console. You can now proceed to upload this certificate to Auth0 as required.
5. Create SAML connection with Auth0 as service provider
To create a SAML connection where Auth0 acts as the service provider and configure the necessary values, follow these steps:
Go to the Auth0 Dashboard and navigate to the Connections section.
Click on the “Create Connection” button and select “SAML” as the connection type.
Enter a name for your SAML connection and click on the “Create” button.
In the SAML connection settings page, locate the “Sign In” and “Sign Out” URLs.
The Sign In URL is usually in the form: https://your.adfs.server/adfs/ls.
The Sign Out URL is also typically in a similar format.
Note down these URLs as you will need them later.
Scroll down to the “Settings” section and click on the “Save” button to save the connection settings.
After saving, you will see a page with instructions for creating a new Relying Party Trust in ADFS. This page will display the exact values required for your Auth0 account/connection.
Make a note of the following values from this page:
Post-back URL: This will be in the form:
If a custom domain is configured: https://<YOUR CUSTOM DOMAIN>/login/callback?connection=YOUR_CONNECTION_NAME
If not using custom domains: https://{yourDomain}/login/callback?connection=YOUR_CONNECTION_NAME
Entity ID: The Entity ID will be in the format: urn:auth0:{yourTenant}:YOUR_CONNECTION_NAME
These values are specific to your configuration and will be used in the ADFS setup.
Make sure to follow the instructions provided by the tutorial to complete the setup in ADFS using the values you have noted down.
6. Create SAML connection with Auth0 as service provider
To edit the Relying Party Trust in ADFS and enable sign requests, follow these steps:
Open the ADFS console and navigate to ADFS > Relying Party Trusts using the left-hand navigation pane.
Select the Relying Party Trust you created earlier and click on Properties (located on the right-hand navigation pane).
In the Properties window, select the “Identifiers” tab.
Populate the Relying Party Identifier field with the Entity ID value from the previous screen. Click “Add” to add the identifier to your list.
Next, select the “Endpoints” tab.
Choose the placeholder URL you provided earlier and click on “Edit…”.
Populate the Trusted URL with the Post-back URL value you obtained from the previous steps.
Click “OK” to save the changes.
Finally, click “Apply” and exit the Properties window.
7. Optional: Enable sign requests
Go to the Settings page for your SAML-P Identity Provider in the Auth0 Dashboard.
Enable the “Sign Requests” toggle.
Below the Sign Requests toggle, you’ll find a link to download your certificate. Download the certificate.
Return to ADFS and load the downloaded certificate using the “Signatures” tab in the Relying Party properties dialog.
8. Enable and test the integration
Before testing the integration, ensure that you have completed the following steps:
Create a user on the identity provider that you can use to test your new connection.
Enable your connection for at least one application.
Go to Authentication > Enterprise > SAML in the Auth0 Dashboard.
Select the connection you want to test and click the ellipsis (…) button, then click “Try”. This will open the Microsoft Sign-in screen.
Sign in with the appropriate credentials and click “Next” to proceed.
You can now test the integration and verify if the SAML authentication flow is working correctly.